September
2016
Furniture repairs
and
Photographing your projects
These talks are summarized below.
Furniture repairs
Furniture
repairs fall under:
1. Restoration
of antique furniture.
Here you need to be very careful of how you approach and make the repair. The
golden rule here is do not remove the old finish, and try to use original
material. If the chair was made with dowels, use dowels in the repair. If mortice and tenon joints were
used and locked with dowelling pins, use the same method.
2. Repairing
recently made furniture, where there is no antique value.
3. Furniture
made from plywood, or chipboard, or hardboard and metal.
Special
requirements
1. Hide Glue
This is the single most important tool you will need.
Adhesive choice can make or break the long-term success of a repair. Hide glue
is an adhesive made from the skins of animals. Furniture grade hide glue comes
from cattle hides. The hides are heated in a water bath to extract the
gelatinous glue. Once drained off and dried, the glue is ground into granules for
sale. Some manufacturers then add ingredients to it to alter the working
properties to make it easy to use for repairing wooden objects. The real beauty
of hide glue is that it will dissolve again when hot water is applied directly
to it. This makes repairs easier. Modern synthetic glues seal the surface of
the wood, guaranteeing that no glue will ever be able to be used on top of it
again. Another benefit of hide glue is its strength - not too weak, not too
strong, but juuuust right. You do not want the
strongest glue on the planet. The glue line in a joint is supposed to be the
sacrificial element in the system. When a chair falls backwards on the floor,
what do you want to fail, the glue line or the wooden components? Adding more
glue into a failed joint is easier than trying to repair a broken tenon.
2. Clamps
Do not use heavy clamps for delicate items. Modern
Quick Grip clamps give the right amount of clamping pressure, are lightweight,
and have built-in clamping pads so you will not mar your furniture when
tightening. The jaw of these clamps can be reversed to loosen some joints.
3. Mallets
Mallets with sand or lead shot in the head help to give an appropriately
directed thump where needed.
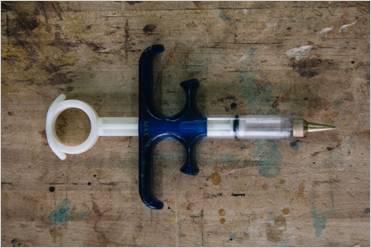
4. Medical Syringes
To disassemble a joint glued with hide glue you need
to get hot water into the joint, you will need a way to apply small amounts
directly to the joint line. Small syringes are perfect for this. Heat water in
the microwave, fill the syringe, and squirt it exactly
where needed. For higher pressures one can use a West System epoxy syringe.
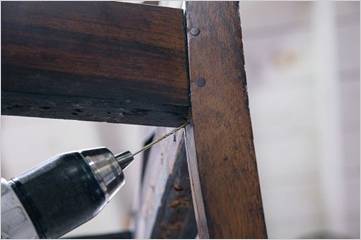
By drilling a very small hole into
the joint from the underside, you can inject water-diluted hide glue into a
loose joint. By rocking the tenon in and out a few
times until you see glue squeezing out around the mortise, you introduce fresh
glue into the joint without complete disassembly. Do not use nails to tighten a
loose joint - they do not stabilize it. It only makes disassembly a mess.
Removing nails always mars the surface and if you do not see them before
forcing a joint apart, you end up with major damage.
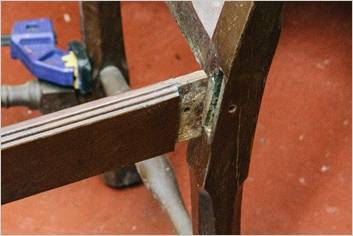
The Mortise
and Tenon Joint
This joint is the most fundamental joint you will find
in antique furniture. The joint can be rectangular or circular. This joint is
used on just about every part of a chair, the bases of tables, and chests with
drawers.
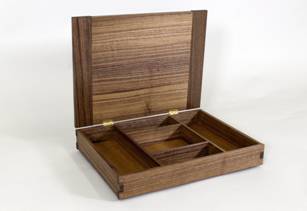
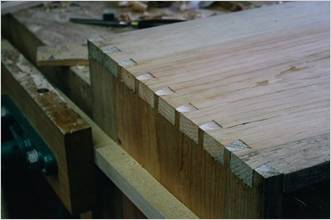
The
Dovetail Joint
The dovetail is the strongest way to join two boards
at 90 degrees to each other. It consists of a wedge-like shape cut into a
board, which is then joined with a piece that has been cut to fit. The
mechanical lock secures the boards to each other even before you glue it.
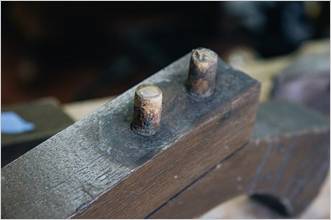
The Dowel
Joint
To economize in construction the traditional mortise
and tenon joint is sometimes replaced by a joint with
two or three dowels. This joint is not as strong as a full tenon
and can make repair slightly more challenging.
The Ten
Commandments of DIY Furniture Repair
1. Respect the
original workmanship.
2. Try to preserve the original material.
3. Do not use nails.
4. Disassemble carefully.
5. Use hide glue where appropriate and not PVA on antiques.
6. Use suitable clamps.
7. Dry clamp first to test-fit the repair before glueing.
8. Do not remove a historic finish. This could devalue the item immensely.
9. Do not use polyurethane finishes on antique furniture.
10. Take the item to a professional restorer when necessary.
Common
Furniture Repairs
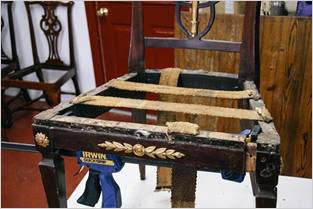
1.Loose Chairs
This is by far the most common repair. If the chair only has one loose joint
and the tenon comes all the way out of the mortise,
apply new hide glue and clamp it back in place. If it does not come all the way
out, drill a very small hole under the joint at an angle so that it goes into
the mortise. Then dilute your hide glue a little bit in warm water, fill a
syringe, and inject the glue into the hole. Pull the tenon
in and out as much as is possible until you see glue seeping out of the mortise
all the way around the tenon. Clamp it overnight.
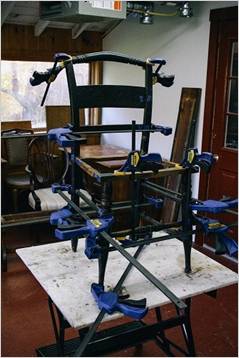
If several
joints are loose, it is best (and more efficient) to disassemble and re-glue.
Before disassembly, examine all the joints to make sure no nails have been used
in the joints. If so, use a nail-set to drive it all the way out the other side
or dig around the head to get a grip on it for pulling it out.
Label each joint with masking tape. Put the same letter or number on both the
mortise and the tenon side of the joint. Then
carefully begin to spread the joints apart. You can use the spreaders to apply
a slow and even pressure. Make sure the spreading is balanced on both sides and
not just one joint at a time.
If the joint is not loosening with spreading pressure, use a mallet to give it
a controlled jolt. This can cause the glue line to fracture, successfully
releasing the tenon. If this does not work, use a
syringe to inject a tiny amount of warm water at the joint line. Allow the
water to seep down into the mortise, wiping away any water on the finish. After
a few minutes the glue will begin to soften, making it easier to spread free.
Any joint that has not come loose, even after a few taps of the mallet, should
be left alone.
Once all the components are disassembled, remove any clumps of hardened glue
off the tenons with a fine rasp or 80-grit sandpaper.
The goal is to remove glue without removing wood. Do not remove wood from the tenons. When every joint is cleaned up, it is important to
do a test assembly. This dry clamp is
critical not only to understanding the logical flow of assembly but also
because it shows up any problems in refitting the tenons.
Put all the parts back together and apply full clamping pressure. Once you are
satisfied that you know how it is going to go, disassemble and get your glue.
Liquid hide glue gives 20-30 minutes of working time, but for PVA glue the
working time is shorter. Apply glue to the tenon and
the mortise, spreading it around for an even coverage. Assemble the entire
chair and clamp it with firm pressure on a flat surface. Do not overdo the
clamping pressure as it is possible to deform the frame out of square. A tiny
amount of glue should squeeze out of the joints if the right amount has been
applied. Clean up this glue while it is still wet with a rag that is damp with
warm water. Leave the chair clamped overnight.
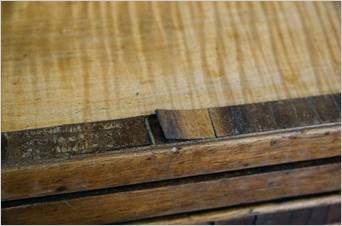
2. Loose Veneer
Veneer is attractive but it can be susceptible to damage. Eventually the glue
fails and little chips of veneer lift off. Save every piece and lay the
fragments in place to check. If there are gaps, use a veneer knife to cut new
pieces to fit the gaps. Test to see if the glue is hide glue. Place a little
bit of warm water on the glue under the veneer. If it becomes sticky after
about 20 seconds, it is probably hide glue. If not, use a veneer knife to
carefully scrape the glue off the surface without removing wood.
Once the veneer and its recess are free of synthetic
glue, spread new glue on the back of the veneer fragment and on the furniture.
To clamp it use a small piece of Plexiglas or a piece of Formica to flatten it
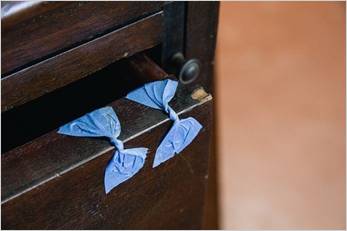
in place with clamping pressure. Alternatively use a masking tape butterfly
technique. Twist a 1-2 inch piece of painters tape in the middle and stick one
side to the veneer and pull it into place and stick the other side down. It
works really well on the edges of tops to pull the veneer tight. The twist in
the tape makes it a lot stronger and enables you to see what is going on
underneath. After leaving it overnight, remove the tape and remove any excess
glue.
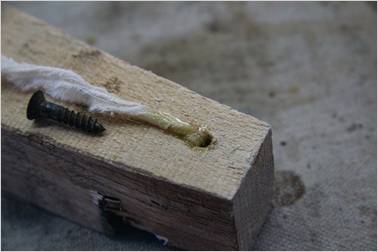
3. Stripped
Screws
Although minor, this is a really common issue. The
usual way to deal with this is to drill out the hole to insert a plug of new
wood in which a new hole is drilled. A much simpler fix is to fill in the hole
a little bit using toothpicks or a small piece of cloth. Dip the cloth in glue
and use an awl to force it into the hole, to one side of the hole rather than
clumped into the middle. After the glue fully dries, trim it flush with a razor
blade and reinstall the screw. Use a drill bit to clear a straight path for the
screw to enter. The repair is easy and strong.
4. Stuck
Drawers
When drawers are hard to pull in and out, check to see
how much wear there is on the drawer sides and the runners on which it slides.
These parts wear down significantly with age and use and the drawer bottom
starts dragging. The runners frequently have a deep groove worn into them.
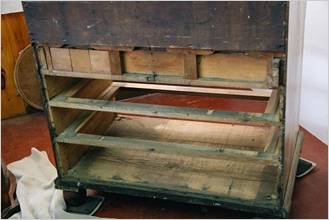
First, try prying the runners off and flipping them over. They are usually glued
and nailed on. Apply new glue and carefully line them back into place. The
nails will hold them in place as the glue dries. This will give some new usable
life without having to make new pieces. The worn drawer side bottoms can be
planed straight and new wood can be glued on and shaped to replace what is
missing. Other drawer issues can be seasonally related. When the humidity rises
in the Spring, wood absorbs more water from the
environment, causing it to swell. This makes moving wooden parts more difficult
to operate. If a drawer is really tight, find out where it is rubbing (sides,
top edge, drawer bottom?) and carefully plane it down. Plane a little, check
the fit. Plane a little more, and again check the fit. Sometimes just waxing
the sides and runners of drawers with paste wax or candle wax will help but it
will not fix the underlying issue.
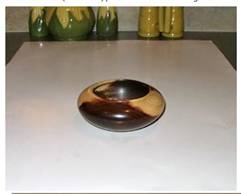
Photographing your projects
The Basics of Photographing Your Work
Most cameras
are more than capable of delivering a perfectly good image, but a few simple
tips will help get the most out of each photo. Cameras have several image quality settings, which determine
the image size and the resolution. A photographic image is a grid of dots,
known as pixels. Higher resolution pictures contain more pixels across each row
and down each column of this grid. Lower resolutions contain fewer pixels.
Image quality and resolution are directly related. Higher resolution means
better image quality.
1. Eliminate
the clutter
The background you choose makes a profound difference
to the eye of the viewer. Anything unnecessary in the frame
of your shot draws attention away from the main object.
2. Get close
Most cameras have a Macro or Closeup
mode (usually designated by a flower symbol). Use it! Position the camera so
that your masterpiece fills at least 50% or more of the viewer. Do not get too
close as this can make it difficult for the camera to focus correctly. Back
away a bit if you find that your autofocus is hunting.
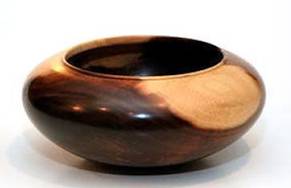
3. Perspective
Do not shoot objects from a straight on view. Choose a
just-over-the-top perspective.
4. Use a tripod.
Even a cheap tripod will usually
yield better images than handheld. Any zoom used magnifies the shakes.
5.
Shutter delay
Your camera has a built-in delay self timer feature. Most cameras have at
least a 2-second delay. This is usually enough time for the camera and tripod
to settle once you have pressed the shutter. Timed delay should be used
any-time you are shooting with a tripod.
6.
Background colour
As a general rule, white is always a safe colour to use.
Light gray also works well in most situations. Red, greens, blues, etc. should
generally be avoided unless there is a specific reason for choosing them.
Colours other than white or gray tend to tint our colour perception of the
subject.
7.
Lighting
One area that immediately stands out when
taking photographs of your woodworking items are the light flashes from the
flash or exterior light sources and the dark spots where the light did not
catch the item. Use can be made of a light box with diffused lighting and a
curved infinity background.

8. Alignment
Most photo editing software has a function to rotate or straighten
images that needs adjusting.
9.
Multiple photos
Unlike the days of film, taking a digital photo costs
nothing but a bit of space on your memory card. Learn from each image you
shoot. Take a critical look at each photo on the on-camera LCD after each shot
and evaluate what you did well and what needs improvement. This should be done
again after uploading the images to your PC.
10.
Photo-editing
This opens up all sorts of possibilities.
Unless you are VERY skilled in photography (and/or very lucky) it is rare for a
perfect shot to come directly from the camera with little or no software
processing needed. Most images can be improved with some photo editing. Most
digital cameras come with their own photo editing software. Several excellent
free packages are available, for example GIMP and IRFAN. Cropping and resizing
can have a negative impact on resolution, and therefore, image quality. If you
use the lowest resolution setting on your camera, you cannot increase the
quality via your software. Always preserve your original images in their
original state, and save edited images using a different file name.